
Scroll It
| Quantity | Price per item | Discount |
| 3 items | $99 | 45% off |
INSTALL INSTRUCTIONS ARE AT THE BOTTOM OF THIS PAGE
Fresh out of the lab is StreetOHV’s newest family member, the stealth emoto street legal lighting kit, 100% plug and play compatibility, finally available and shipping immediately.
Designed with careful consideration to fit in the ultra tight space, this micro-kit includes sequential turn signals front and back, intelligent hyper flash initial braking, horn function, mirror, and a micro plate light. New for late 2025, we designed the world's smallest flasher relay and built it into every harness, ensuring even signaling front and back (wont find that with our competitor!)
Enjoy the illuminated Multi Switch to easily see the real time status and offer a master lights-off button to go full stealth mode and evade whatever dangers lurk out for you at night (often with red and blue flashing lights),
Included is our Mini Integrated Tail Light exclusive to StreetOHV. Mounts cleanly under the seat for a streamlined look and desirable functions like flowing sequential signals and hyper flash initial braking that resets after 30 seconds.
Now choose between our classic DRL Fork Turn Signal Strips or our brand new Mini Sequential Signals for a truly custom setup.
Install may require removal/reinstall of the left grip, so we offer ProTaper Grips to replace your worn out old ones. And to increase visibility, safety, and overall steeze, we now offer the Chimera 20W Headlight at a discounted package price.
Need a plate to hit the streets legally? We can do that with our eMoto Plate Service
Kit includes:
Micro P&P Harness with built-in flasher relay
Illuminated multi switch controller
Front Fork DRLs/Turn signals or Mini Signals with Fork Mounts with sequential flowing
Mini Integrated Tail light with sequential flowing signals and intelligent hyper flash braking
Micro Adhesive plate light with quick connector
DISCLAIMERS:
*Eride 3.0 switch is compatible with our kit, but the surron switch we sell is not compatible with the eride 3.0
**Our kit utilizes 1x OEM 2-pin style brake sensor for the brake light to function. Many people (including us) threw these out, so hopefully you didn’t, but we have sourced them for those who did. Use a pen spring cut in half if you also threw out the original spring to maintain correct spacing and tension if your lever does not have a tiny Allen set screw**
***IF YOU HAVE AFTERMARKET BRAKES*** you will need to find a solution that works for you. There are many aftermarket ebike brakes that include a built-in switch like Magura, who also offers an in-line switch for systems that do not have one. We do not offer an adapter for these, so you will have to cut and connect our 2-pin brake switch/sensor to have the brake light function***
****MX4 with the later 3 pin style brake switch are not compatible, you will need to add the 2 pin style we sell, its a direct replacement****
*****MX5 now uses a different type of sensor altogether. you will need our brake sensor and connect it to your existing sensor as others do for aftermarket brakes. Polarity does not matter*****
INSTALL: read FULLY first!
Use progressive testing when installing to avoid issues. We only recommend mounting all components AFTER complete functionality is confirmed.
Step 1.TURN BIKE OFF. Trace back your headlight to your bikes harness connection. Disconnect the harness from the headlight.* Connect OUR harness to the bikes harness for power. ***If you don’t have a 4 pin talaria, you will notice two plugs are the same shape, use the one with black/brown/yellow wires*** Plug your headlight into the only plug where it can fit.
Step 2. Plug in the main switch. TEST FUNCTION. Your headlight should turn on with the bike on, and the turn signal buttons should illuminate. If you have issues, go back to step 1.
Step 3. TURN BIKE OFF. Connect FRONT signals. If using fork strips, ensure pins are straight and the plug glides in without resistance. If using our new mini signals, use the black/blue and black/green bullet connectors coming off the 3 pin plugs. TEST. DRLs should illuminate and turn signals should activate with the switch. Be aware there will be extra plugs depending on which front signals you went with.
Step 4. TURN BIKE OFF. Connect tail light by matching the colors to appropriate bullet connectors. TEST. Tail light should illuminate and signals should activate.
Step 5. TURN BIKE OFF. Trace one of your brake sensors back to their plugs and disconnect from the bike and plug it into our kit** TEST. Brake light should illuminate. Adjust engagement point as needed at the lever.
Step 6. TURN BIKE OFF. Find the clear/black plug with white and black wires. These are for the plate light. Use the included matching plug to connect it. The clear bit is hinged and opens to allow wires to insert, then close the hinge until you hear the clear part snap into place. Pliers can help. Polarity may be reversed so be sure to TEST. ***if having issues, you may need to remove some insulation to allow the bare wire to contact the terminals
Step 7. TURN BIKE OFF. Install orange horn wire to the + terminal on your horn. This isn’t clearly identified so you will need to test and switch if necessary. Plug orange wire into one horn lead, then use other side to connect the bikes lead you just removed from the horn. TEST.
Finally, TURN BIKE OFF and install all components after testing passes. Tail light is designed to mount under the seat area using the included machine screws. Plate mount replaces Oem tail light bracket.
*IF you want to maintain function of your OEM headlight switch, be sure the switch stays connected between our harness and the headlight, not our harness and the bikes harness. ON the MX5, we understand the OEM switch has no plug to the harness. We recommend keeping the headlight ON and hiding it somewhere out of sight.
**IF you purchased our sensor, install it into the brake lever using half a pen spring. you will need to adjust to set correct brake function. DO NOT fully tighten the sensor screw. test which spot works best.

Making the impossible happen. We are motorsports enthusiasts and just like you, we loathe restrictions. Our experts have engineered innovative products and creative solutions to overcome the problems and hassles involved with street legalization. Our goal is efficiency with a sense of urgency.
Practice made us perfect, enabling us to proudly offer top quality products and services to the masses. Not digging the design of the current lighting kits available on the market? We sure as hell didn't. Not finding a way to hit the streets legally on your two stroke? Let us handle it.
Riding season is coming, and we want you creating unforgettable experiences as fast as humanly possible. Don't give up the dream. Let us free you from the limits, derestrict you from the law, and let you do what you love most, more often. We know you want it because we did too, and now you have friends to help.
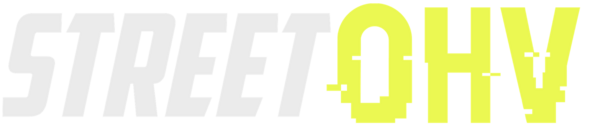
This couldn’t be more perfect, I love the stealth look I want it to look 👀 stock as possible.
Ryan
owner
We're a small group of Northern California natives with engineering backgrounds who grew up on two wheels, and sometimes only one. Street riding with our dirt toys was always legal taboo. We couldn't stand it, and didn't always obey the law.
Following too many close calls, we decided to finally quit taking the risks and get legitimate. After countless DMV trips, inspections, red tape, roadblocks, and headaches, we realized this was a challenge. So, like all problems, we set out to solve them.
Now, we are a team of in-house fabricators and technical experts ready to transcend the off-road industry, one plate at a time.